Add Authentication to Your Statamic CMS Pages
Learn how to add authentication to your Statamic pages using built-in protection schemes. This guide walks you through enabling per-page access control, configuring your Blueprint for easy management, and setting up a custom login page — all without extra plugins.

When I first started building websites with Statamic, I wondered how to add authentication to a website — or just to specific pages. Coming from platforms like Sitefinity and Orchard, I expected a simple checkbox to enable authentication for a page, but that’s not how it works in Statamic.
Instead, Statamic uses a flexible concept called protection schemes that allows you to define access control per page or site-wide. Let’s walk through how to use them effectively.
Understanding Protection Schemes
According to the Statamic documentation, you can deny front-end access to your content on a per-page or site-wide basis.
Out of the box, Statamic provides three protection schemes:
- IP Address — Allow access only from specific IP ranges.
- Authentication — Require a Statamic user to be logged in before accessing the page.
- Password — Password-protect a page or file — no user accounts required.
Since I wanted users to log in before accessing certain pages, I went with the Authentication scheme.
Step 1 — Add a Protection Scheme to Your Page
To apply a protection scheme to a page (or collection entry), you can simply add a protect variable to your page’s YAML front matter:
title: Members Only
protect: logged_in
Here, the page uses the logged_in scheme, which relies on the auth driver to handle authentication.
Reference: https://statamic.dev/protecting-content
Step 2 — Add Authentication to Your Blueprint
Manually adding a protect variable to every page file isn’t very efficient.
A better way is to extend your Page Blueprint with a field that allows editors to choose whether a page should require authentication.
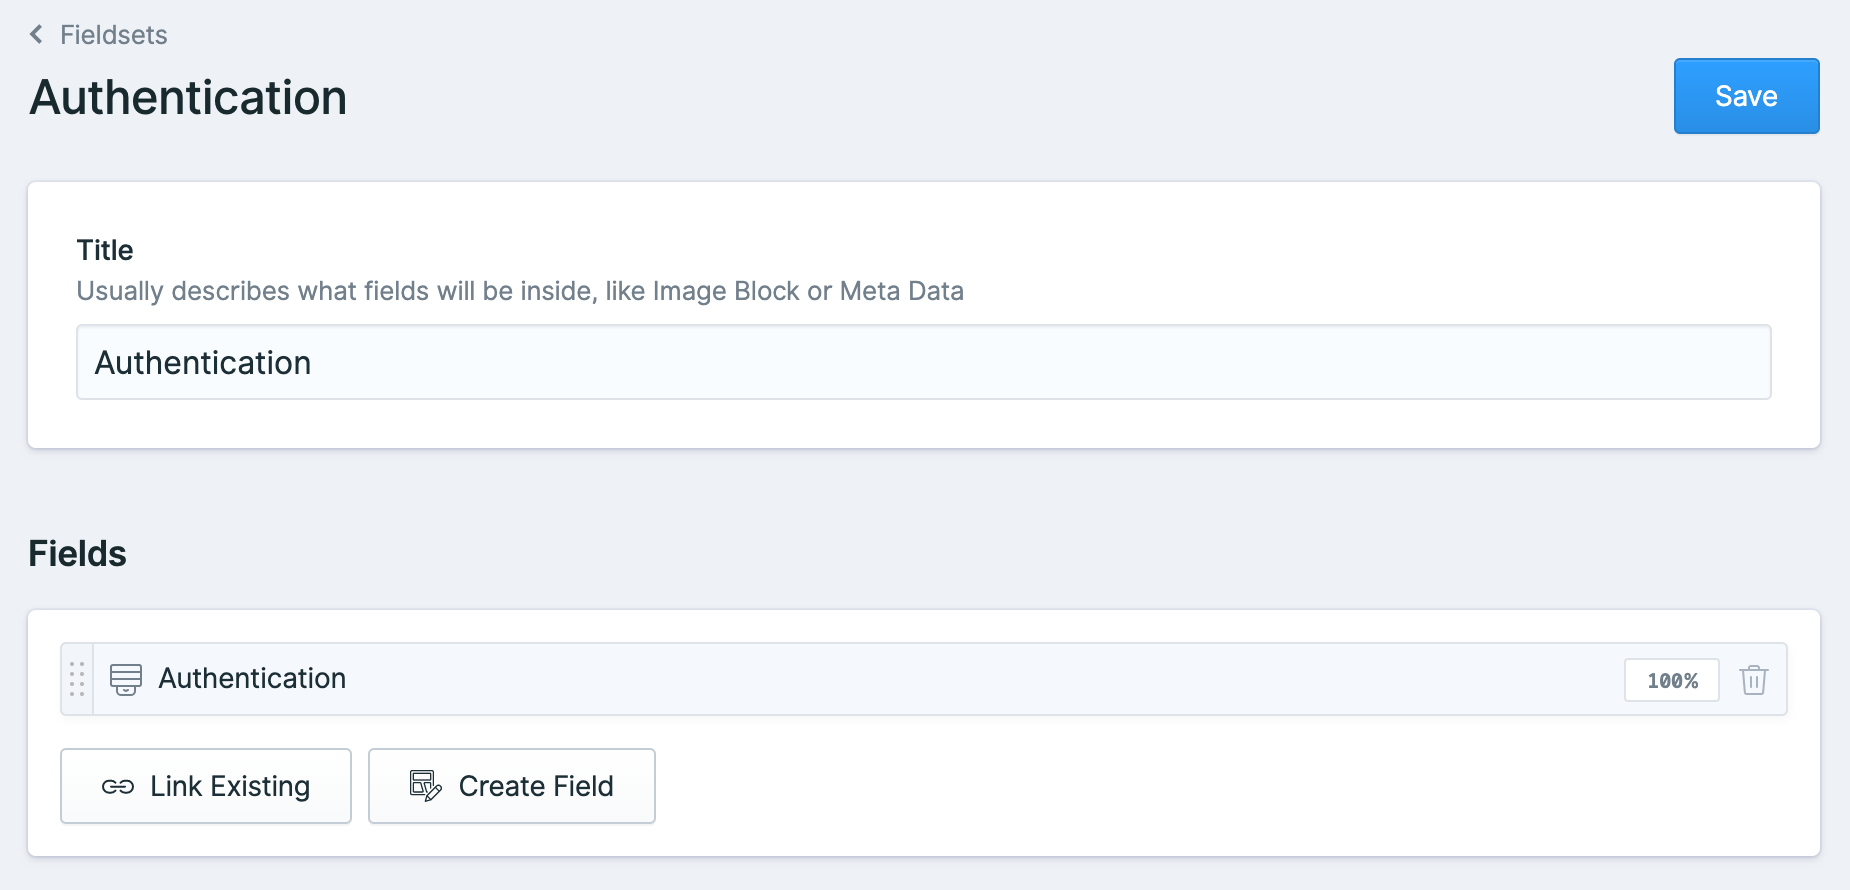
You can create a new Fieldset called “Authentication”, then link it to your Page Blueprint.
Step 3 — Define the Fieldset in YAML
title: Authentication
fields:
  -
    handle: protect
    field:
      options:
        'null': None
        logged_in: Authenticated
      multiple: false
      clearable: false
      searchable: false
      taggable: false
      push_tags: false
      cast_booleans: true
      display: Authentication
      type: select
      icon: select
      default: 'null'
      listable: hidden
When an editor selects Authenticated, the value of protect will be set to logged_in.
That means the page will automatically redirect to a login page when accessed by a non-authenticated visitor.
If they select None, the field will be null, leaving the page public.
Step 4 — Configure Your Login URL
When using the auth driver, Statamic will redirect unauthorized users to your login page.
If you haven’t defined one yet, you might see a 404 error when visiting a protected page.
'logged_in' => [
    'driver' => 'auth',
    'login_url' => '/login',
    'append_redirect' => true,
],
If /login doesn’t exist yet, simply create a login page using Statamic’s built-in tag:
<form action="{{ route:login }}" method="post">
  {{ csrf_field }}
  <input type="text" name="email" placeholder="Email">
  <input type="password" name="password" placeholder="Password">
  <button type="submit">Login</button>
</form>
Reference: https://statamic.dev/tags/user-login_form
Wrapping Up
By leveraging Statamic’s built-in protection schemes, you can easily control access to your pages without extra plugins or code.
Extending your Blueprint with a simple select field gives editors a user-friendly way to manage authentication directly from the Control Panel.
If you need more advanced control (like role-based access or custom guards), you can always integrate Laravel’s authentication system — but for many use cases, Statamic’s native protection is all you need.
References:
- Protecting Content – Statamic Docs: https://statamic.dev/protecting-content
- User Login Form Tag – Statamic Docs: https://statamic.dev/tags/user-login_form

I offer hands-on consulting to help you resolve technical challenges and improve your CMS implementations.
Get in touch if you'd like support diagnosing or upgrading your setup with confidence.